When I was an undergraduate at Berkeley in the 1960s, I lived right across the street from a funky little grocery store. Once a week they'd put up a sign advertising carrot cake. I never bought it because I couldn't get my mind around a vegetable in a cake (and I couldn't really afford it). Fast forward ten years and I was in graduate school at USC, and from time to time I'd get together with two other students, Connie and Sam, and we'd study late into the night. To fortify ourselves and give us the incentive to keep awake, Sam made his grandmother's carrot cake. It was so simple he could do it from memory, and it required very little in the way of specialized equipment. As long as you had a grater, and some kind of baking pan (we used a rectangle or a bundt pan), you were in business. I have only changed a few things over the years, but the biggest change was to dramatically increase the amount of carrots and to cook it much less, both of which yield something, which if done correctly, is moist and gooey, almost like a pudding in the middle. And, of course, the irony is that now I'm Sam's grandmother!
A couple of notes before we begin. While we used an old-fashioned grater in the old days, now I use the grating attachment to the cuisinart, which looks like this:
It greatly simplifies things and saves your knuckles from being grated. Still, this is a luxury item, not a necessity. You'll want to grate the carrots first, as they're the only labor-intensive part of this recipe.
First, I peel the carrots and cut them into pieces that will fit into the cuisinart standing up, like this:
It's important to try to pack the carrots in standing up so that you don't get long thin strips of carrots.
Originally, the recipe called for about 3 cups of grated carrots, but I gradually increased them and currently I like to use most of a 2 pound bag of organic carrots. It may seem like a lot, but they're mostly water and they cook down into the batter. When you're done, it'll look like this:
Also, this is an old recipe, so I have always used scoop and level to measure the ingredients. Just scoop your 1 cup measure in the flour and level it with a knife.
Oh, and don't forget to toast the nuts now, if you're going to use them.
SAM'S GRANDMOTHER'S CARROT CAKE
2 cups AP flour
2 cups sugar
2 teaspoons cinnamon (I like to use Chinese cassia)
1 teaspoon baking soda
1/2 teaspoon sea salt
1 1/2 cups canola oil
1 3/4 lb shredded carrots
4 eggs, at room temperature
Optional: 1 cup toasted pecans or 1 cup toasted walnuts or 1 cup baking raisins...your call
Cream Cheese Frosting:
8 ounces cream cheese, at room temperature
4 ounces unsalted butter, at room temperature
2 teaspoons vanilla
16 ounces powdered sugar
Preheat oven to 350 degrees F.
Grease and flour a 9x13-inch pyrex pan. [I have experimented with using a metal one and it dries the cake out too much]
Mix dry ingredients in the bowl of a mixer (or by hand if you don't have one).
Add carrots and mix thoroughly.
The finished batter should look like this:
Bake for 35 minutes, then test to see if a toothpick comes out slightly damp.
You really don't want to overcook it, so don't wait until the center has completely risen or a toothpick comes out clean. This is a moist cake, so there should be some moisture on the toothpick.
The cake has to cool completely before it can be frosted. This is the hard part, because it smells so good. And when we were studying late at night, it was excruciating. It will probably take almost two hours to be completely cool, so plan accordingly. Maybe start it in the morning.
Anyway, once it has cooled you can start on the frosting. Again, it can be made by hand, but if you have a mixer with a whisk attachment, you will be able to achieve a light, fluffy frosting by whipping air into it.
Start by mixing the butter, cream cheese, and vanilla to blend.
Next, add the powdered sugar. You can add it in two parts, and start the mixer very slowly to reduce the powdered sugar-dust that tends to want to coat everything in sight.
After you have all of the sugar mixed in, it will look like this:
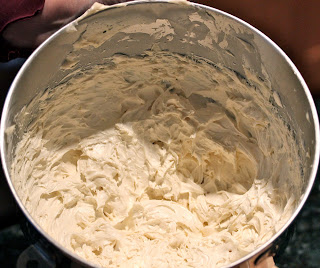
Continue mixing for about 5 minutes, or until the frosting is light and fluffy and it looks like this:
I pour it all on top of the cake,
then spread it into the corners.


No comments:
Post a Comment